
Struggling with sciatic nerve pain? Discover gentle, effective yoga for lower back pain. Decompress your spine. If you are feeling sharp pain from the hip to the thigh, or sometimes even the heel, it could be due to a pinched sciatic nerve. And in most people, it starts in the lower back, when the spinal cord gets pinched and the sciatic nerve gets pinched.
And you might have noticed that it gets worse when you stand for a long time, like in the kitchen, or walk long distances, or sit for too long, or drive for too long. The good thing is that yoga offers some beautiful stretches that relax the spine, create space, and help relieve this pain instantly.
So that is what we will do today, and in case of any sharp pain during the asanas, please don’t practice that particular asana, either change it a little, do it slowly or skip it altogether. So I invite you to start with Dandasana, where you’re in a seated staff pose, stretch the legs forward, lengthen the spine, and bring your hands right next to your hips. Now press your hands down and feel even more of a stretch in the spine. Keep pressing through the hands. Your legs are active here.
The feet are active. The toes are pointing up to the sky. The leg is bent. And take five deep breaths here [MUSIC]. The tighter the hips, the tighter the hamstrings, the more likely it is to hurt. So during this class, you’ll be able to improve the mobility of your hips.
Breathe. Great. Now bend the right knee and bring the right knee directly over the left knee. Then hold your hands under the left knee, and we’ll try to bend the left leg.
So this can be a strenuous stretch. So do as much as you’re comfortable here.
Ease yoga for lower back pain and the Power of Yoga
Don’t round your upper back. Don’t round your shoulders. Keep your shoulders away from your ears. And then try to bring your chest down to your thigh. So you’re basically leaning forward from the hips.
And breathe here. So you’ll feel an intense stretch in your left hip, down to your left heel. Breathe deeply into the tight spaces.
Get oxygen delivered through your muscles, through your tissues, to the fascia, which connects your tissues and muscles. Great. Come up slowly.
Preparing for Your Practice: Safety and Hydration
Release. And we’ll take it to the other side. Extend the right leg. This time, bring the left knee over the right knee. Clasp your hands under the right knee. Lengthen the spine this time. Keep the shoulders away from the ears. And lean forward. And Breathe. Guys, dehydration is also a big cause of nerve pain. So if you’re not drinking enough water or eating a lot of dry food, your nerve pain will be even worse. So increase your intake of fresh vegetable juices and coconut water.
Consume more hydrating foods like vegetables and fruits, and avoid processed foods like chips and noodles.
These are very dry in nature. They suck out the water from your body. So, hydrate yourself well. Every time you exhale, try to bend a little more forward without sharp pain.
You are just intensifying your stretch.
And here, notice that while you are breathing in, you will also feel the stretch in your lower back. Very good. Release and come up.
Stretch the leg. Now, see what I am doing.
Your Gentle Yoga Sequence for Sciatica Relief
We will bend the right leg, bend the knee, and bring the right foot outside the left knee. And then we will bend the left leg as well. Both hips will be on the mat.
So from the front it will look like this. Here we are. We will bend the right knee. Bring the right foot outside the left knee. And bend the left knee as well. Yes. Come into this posture. We are doing Ardha Matsyendrasana. Now there are two options here.
First you can grab the right knee with your left elbow and take the right hand back. And here you will feel a beautiful openness in your right hip. This is the first level. And if this is comfortable for you and you want to go deeper and intensify your stretch, bring your left elbow to the outside of the right knee and then bend. So here you will feel an extension of a twist from your lower back, middle back and navel. Take a deep breath here, friends.
On your next exhale, bend a little more and release gently. No fast movements in yoga. Very gentle, smooth movements. This time we will bend the left knee. The left foot will come to the outside of the right knee, and then we will bend the right knee. Both sitbones are on the mat. Now you can either grab the left knee with your right elbow and bend
Another cause of pressure in the back is poor posture, and this can cause all kinds of discomfort in your back, in your hips, a lot of stiffness, and tightness. Breathe.
Seated Staff Pose (Dandasana) – Finding Length
Each time you exhale, try to fold a little more from the navel. Very good. Gently come back to the center. Release the feet. Move the feet to one side. Bring your hands to the mat. And we will lift the hips coming to our toes. Doing Adhomukha Svanasana, doing Adhomukha Svanasana. Here, your heels may not come to the mat. That’s okay. Don’t worry. Just feel the expansion in your hips.
Keep sending your hips back and up. Keep pushing away from your hands. Very good. From here we will do Rajasana. So, for this, bring your right knee to your right thumb. The back leg will extend to the mat. You will feel a beautiful openness in the right hip.
If this is difficult, you can put a pillow under the right hip. If the hip is lifting too much or you are not able to sit properly here, put a pillow under your right hip. Because we don’t sit on the ground very often, we sleep on high beds, sit on chairs, and our hips get very stiff. So, during the day also see if you can do some activities on the ground.
So maybe eat on the ground, or if you are working from home, work on the ground for a few hours. Great. Bend your back toes and come back to the Down Dog pose. Once again. And push away with your hands. And then this time we will bring our left knee to the left thumb. The right foot will go backwards. It will be almost in the middle of the mat. Stay active in the back foot. And breathe. This time, feel the openness in your left hip.
Don’t hesitate to use a cushion under the left hip. Many times, we also accumulate many emotions in this area. This is the area of Swadeshana. So a lot of sanskaras or a lot of unresolved emotions like guilt, shame, resentment towards others get accumulated here. So ask yourself, am I holding in any emotions, not processing them, denying any emotions that I could be releasing? And you may find relief from your pain as well.
We have to work from all angles, not just the physical angle, but the emotional angle as well. Breathe.
Targeted Single-Leg Forward Fold (Janu Sirsasana Variation)
Each time you exhale, try to fold a little more from the navel. Very good. Gently come back to the center. Release the feet. Move the feet to one side. Bring your hands to the mat. And we will lift the hips coming to our toes. Doing Adhomukha Svanasana, doing Adhomukha Svanasana. Here, your heels may not come to the mat. That’s okay. Don’t worry. Just feel the expansion in your hips.
Keep sending your hips back and up. Keep pushing away from your hands. Very good. From here we will do Rajasana. So, for this, bring your right knee to your right thumb. The back leg will extend to the mat. You will feel a beautiful openness in the right hip.
If this is difficult, you can put a pillow under the right hip. If the hip is lifting too much or you are not able to sit properly here, put a pillow under your right hip. Because we don’t sit on the ground very often, we sleep on high beds, sit on chairs, and our hips get very stiff. So, during the day also see if you can do some activities on the ground.
So maybe eat on the ground, or if you are working from home, work on the ground for a few hours. Great. Bend your back toes and come back to the Down Dog pose. Once again. And push away with your hands. And then this time we will bring our left knee to the left thumb. The right foot will go backwards. It will be almost in the middle of the mat. Stay active in the back foot. And breathe. This time, feel the openness in your left hip.
Don’t hesitate to use a cushion under the left hip. Many times, we also accumulate many emotions in this area. This is the area of Swadeshana. So a lot of sanskaras or a lot of unresolved emotions like guilt, shame, resentment towards others get accumulated here. So ask yourself, am I holding in any emotions, not processing them, denying any emotions that I could be releasing? And you may find relief from your pain as well.
We have to work from all angles, not just the physical angle, but the emotional angle as well. Breathe.
Seated Spinal Twist (Ardha Matsyendrasana) – Creating Space
Great. Turn your toes back. And once again, come into Down Dog pose. Push your hips back.
Bring your knees to the mat. Move your feet to one side. Once again come to the seat. This time, bring your hands behind your hips. Fingers pointing at the hips. And here we’re going to act like windshield wipers with the feet. So we’re just going to move the feet from side to side.
And try to get the feet all the way to the mat. The knees are all the way to the mat.
Now see if you can come down onto your elbows and continue this movement. Keep breathing. There should be no holding of breath at any point. Should you hold your breath? The more fluid the breath, the more fluid the body. Great. Now lie on your back and arch your tailbone, friends. So when you lie on your back, there is a natural arch in the back.
We want to avoid this natural arch, and arch the tailbone in such a way that the back is firmly on the mat.
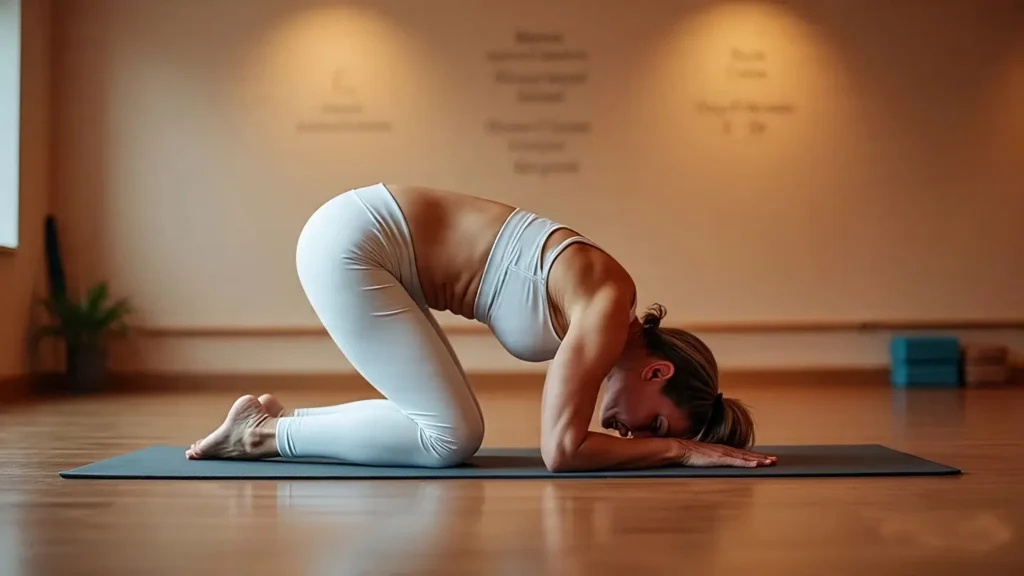
Downward-Facing Dog (Adho Mukha Svanasana) – Full-Body Decompression
Now, after doing this, press down with your left foot and extend the right leg upwards, holding your hands behind the right knee. Now try to pull the leg towards you and feel the stretch in your hamstrings and calf muscles.
This whole area is stretching. Breathe here. Now see if you can lift your torso up and try to bring your nose to the knee.
Awesome. Breathe.
Great. Let the head hang loose. Now we’re going to bend the right knee, and bring the right heel over the left thigh. See how my feet are in a figure four on the palm. My whole body looks like a figure four right now.
Now we’re going to lift the left foot off the mat. We’re going to bring our arms out of the space between the legs and clasp our hands behind the left knee. I’ll show it one more time. So here we were. We’re going to bend the right knee.
Bring the right heel to the left knee, making a figure four with the body. Then we’re going to lift the left foot and clasp our hands behind the left knee through the space between the legs. Now, once you’re here, pull your feet closer to you until you feel a beautiful stretch in your right hip and breathe here.
The most important thing is to breathe. This is Sa Kapotasana. This is one of the best asanas to get relief from sciatica pain in particular. So if you have little time and you want to do something to get instant relief from pain, then this asana is for you. Very nice relaxation.
Now this time we will put the right foot on the mat, press the left leg firmly and extend it above you, put your hands behind the left knee, and try to pull the foot towards you to feel a deep stretch in your hamstrings, calf muscles, and even the calf. This way your whole left leg will be here. If you bend the foot, the stretch will be stronger. So if you bring the toes closer to you, the stretch will be deeper. Now see if you can lift your torso and bring your nose to your knee. Don’t shrug your shoulders.
Keep your shoulders away from your ears. And breathe.
Low Lunge (Rajaasana Variation) – Opening the Hip Flexors
Leave the head loose. And now we will bend the left knee, bring the left heel to the right knee.
Lift the legs and insert your arms through the gap between the legs.
Hold the hands behind the right knee. This time, pull the legs closer to you. You can use your left elbow to open the leg a little more. So push the left knee away using your elbow and see how the stretch in your left hip flexor increases.
We teach many of these asanas, yoga philosophy and pranayama in our 21-day Yoga Sadhna program. It is an amazing journey that we have designed for beginners. So if you want to join us in the next program, check out the link in the description below.
Breathe in. Very good. Exhale. Extend both legs. And now bring the right knee in. You are holding the right knee with your hands. Do not let the left leg loose.
Keep it planted. From here, we’re going to move the right knee to the left side of the mat. We’re going to try to get the left knee, uh, right knee to the floor. If that’s difficult, you can put a cushion. And you open the right arm to the right, keep both shoulders on the mat. So if that’s challenging again, use a cushion under the knee, and your gaze will go to the right. So Matsyendrasana Spinal Twist. Another beautiful stretch to open your back. Come back to the center. Bring the right knee in once again and then release. And then bring the left knee in. Clasp it with your hands. Bring it in. And this time move it to the right. The left arm will open up. Both shoulders should be on the mat, and your gaze should also go to the left.
Breathe.
Supine Hamstring Stretch (Supta Padangusthasana) – Gentle Release
Feel the openness in your back. See how the vertebrae are contracting and moving away from each other.
You will feel immediate relief, although the body is stretching, which is not very comfortable, but it will still feel like relief. Come back to the center. Press the knees inwards. Release. And this time make a diamond with your legs. So the legs come together, knees open. Keep the feet on the mat and the arms by the side, elbows bent. You can put a pillow under your back if you want. And just breathe. Inhale, expand the lungs.
Consciously take a little deeper breath. And exhale, relax. Inhale. Take another deep breath.
Feel the breath going straight to the diaphragm.
Reclining Pigeon Pose (Sucirandhrasana or Figure-Four Stretch)
And exhale, relax. You also need to calm your mind to get relief from any kind of pain.
Inhale. And this time exhale through the mouth. Sigh.
Ah, very good. Close them with the hands under your knees and then come up slowly, turning to your right side.
Sot a sprint. Be patient and kind to yourself, and you will gradually reclaim comfort and mobility.
FAQs
1. How often should I do this yoga sequence for sciatica pain?
For best results, aim to practice this sequence daily, especially when you are experiencing acute pain. Even a shortened 15-minute version can be beneficial. Consistency is more important than duration.
2. I felt a sharp pain during one of the stretches. What should I do?
Stop immediately. Sharp pain is your body’s signal that something is wrong. Do not push through it. The next time, try a significant modification of the pose (using props like cushions), perform it with even more gentleness, or skip it entirely and focus on the poses that feel good.
3. Can yoga cure my sciatica?
Yoga is an incredibly effective tool for managing and alleviating sciatica pain, especially when it’s caused by muscular tightness or compression. However, if your sciatica is caused by a severe structural issue like a large herniated disc, it should be used as a complementary therapy alongside guidance from a healthcare professional like a doctor or physical therapist.
4. Why is hydration so important for nerve pain?
Dehydration leads to less pliable tissues and increased inflammation. Nerves are surrounded by tissues and require adequate hydration to function properly and transmit signals without irritation. Well-hydrated muscles and fascia are less likely to compress and irritate nerves.
5. Are there any poses I should absolutely avoid with sciatica?
Yes, poses that involve deep forward folds with rounded backs or intense, deep twists can sometimes aggravate sciatica. This includes poses like Paschimottanasana (Seated Forward Bend) or full Padmasana (Lotus Pose) if done forcefully. Always prioritize poses that create space and length in the spine over those that compress it. Listen to your body above all else.